 Singapore
 Thailand
 Indonesia
[vc_row][vc_column][vc_column_text]Hooray, congratulation on getting yourself a FREE thermal printer from us!
Now, you’re a step closer to a faster packing process and a better focus whenever you make use of the thermal printer. From preparing yourself to use sticker AWB to speed up the packing process for your shipments, here’re the quick tutorials for you to setup the thermal printer and kick start your delivery journey with sticker AWB![/vc_column_text][/vc_column][/vc_row][vc_row][vc_column][vc_tta_tabs][vc_tta_section title=”Thermal Printer – USB version” tab_id=”1612443643048-d3704219-796a”][vc_custom_heading text=”Setup Thermal Printer For Window” font_container=”tag:h3|font_size:30|text_align:center|color:%23f9278e|line_height:2.5″ google_fonts=”font_family:Lato%3A100%2C100italic%2C300%2C300italic%2Cregular%2Citalic%2C700%2C700italic%2C900%2C900italic|font_style:700%20bold%20regular%3A700%3Anormal”][vc_video link=”https://www.youtube.com/watch?v=RjIhy3euVv0″][vc_message]
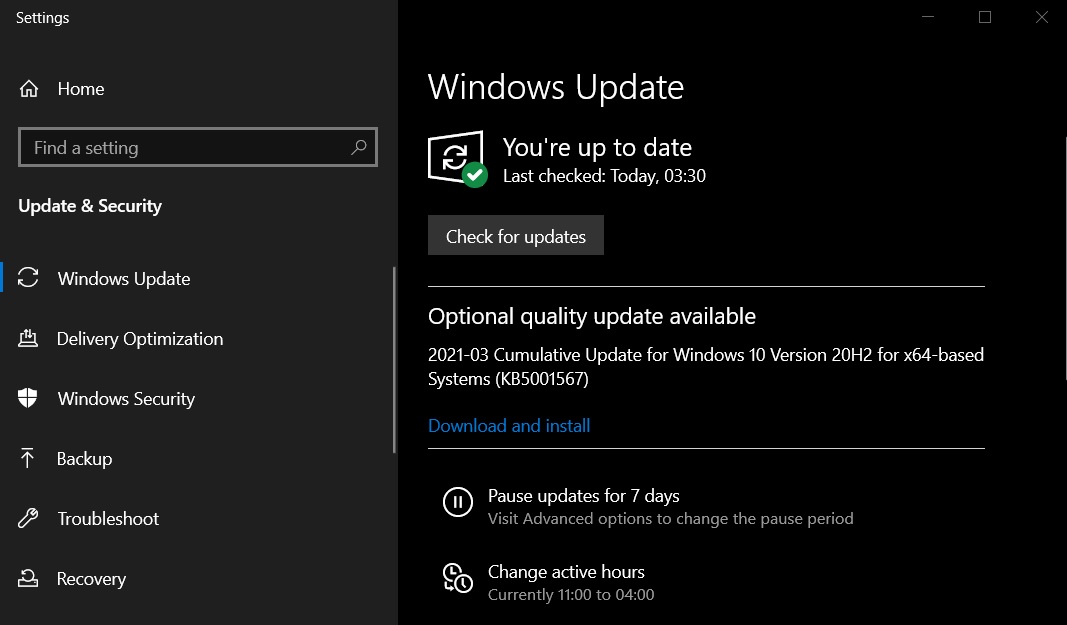
- Step 1: Click “Settings” in the Start menu.
- Step 2: Find “Update & Security” in the setting interface.
- Step 3: Under the optional updates section, click on ‘Download and Install’ or you can also visit optional updates in the Settings app.
Your thermal printer is ready to roll once you’ve done the steps stated above. Click here to know more on this hiccup.
[/vc_message][vc_separator][vc_custom_heading text=”Setup Thermal Printer For Mac” font_container=”tag:h3|font_size:30|text_align:center|color:%23f9278e|line_height:2.5″ google_fonts=”font_family:Lato%3A100%2C100italic%2C300%2C300italic%2Cregular%2Citalic%2C700%2C700italic%2C900%2C900italic|font_style:700%20bold%20regular%3A700%3Anormal”][vc_video link=”https://youtu.be/Ae2yps4mayg”][vc_btn title=”View SoonMark For Drivers Download” style=”gradient-custom” gradient_custom_color_1=”#f9278e” gradient_custom_color_2=”#f9278e” align=”center” link=”url:http%3A%2F%2Fsmkjjt.com%2Fdownload%2F||target:%20_blank|”][vc_toggle title=”Unable to Open the Driver’s File – MacBook” custom_font_container=”tag:p|text_align:left” custom_google_fonts=”font_family:Lato%3A100%2C100italic%2C300%2C300italic%2Cregular%2Citalic%2C700%2C700italic%2C900%2C900italic|font_style:400%20regular%3A400%3Anormal” use_custom_heading=”true”]Dear MacBook Users
If you’re facing this scenario: Unable to open the driver file
This is due to some applications not being signed by Apple and will not be able to be installed. Hence, you may follow these steps:

Open “System Preferences” >>> click “security & privacy” >>> go “General” tab >>> select “App Store and identified developers” >>> click “open anyway” button

For more information, you can click HERE
[/vc_toggle][/vc_tta_section][vc_tta_section title=”Thermal Printer – USB+Bluetooth version” tab_id=”1612443643082-4f9426a5-ca8e”][vc_message]Bluetooth connection only available for Windows, iOS, and Android.
For MacBook users will have to connect with USB as Bluetooth feature unable to support.[/vc_message][vc_toggle title=”Setup Guidance (Windows)” custom_font_container=”tag:h2|font_size:20|text_align:center|color:%23f9278e|line_height:2.5″ custom_google_fonts=”font_family:Lato%3A100%2C100italic%2C300%2C300italic%2Cregular%2Citalic%2C700%2C700italic%2C900%2C900italic|font_style:700%20bold%20regular%3A700%3Anormal” use_custom_heading=”true”] Step 1: Make sure you have connected your computer with the thermal printer via USB. Then click on the “Download” button to install Printer Driver (for Win7 Win8 Win 10) at http://smkjjt.com/download/
 Step 2: Go to “Settings” and turn on “Bluetooth”.
 Step 3: Click on the “+” button to add a device and click on “Bluetooth”.
 Step 4: Select “SMK-M8”. Then key in the pin number with “0000” or 1234” to connect with the thermal printer.
 Step 5: The printer has connected successfully with your laptop now.
 Step 6: Open the downloaded driver file and click on Printer Driver (for Win7 Win8 Win 10).
 Step 7: Click on “Driver (for Win7 Win8 Win 10)”.
 Step 8: Tick on “Accept” and click “Next”.
 Step 9: Click “Next”.
 Step 10: Tick on “Run Driver Wizard after unpacking drivers” and click “Finish”.
 Step 11: Tick “Install printer drivers”, then click “Next”.
 Step 12: Tick “Bluetooth”, then click “Next”.
 Step 13: Select “SMK-M8”, then click “OK”.
 Step 14: Select “4BARCODE 4B-2054D”, then click “Next”.
 Step 15: Click “Next”
 Step 16: Click “Finish”
 Step 17: The driver is installing
 Step 18: Click “Close”.
 Step 19: Select the printer and click “Properties” button. Then, go “page setup” tab, and select “4 x 6” (A6 size).
 Step 20: If you want to print in faster speed or darker ink, you may go to “option” tab to select the speed or darkness that you preferred.
(p/s: greater darkness if higher number)[/vc_toggle][vc_btn title=”Download ‘SoonMark Print’ for Windows” style=”gradient-custom” gradient_custom_color_1=”#f9278e” gradient_custom_color_2=”#f9278e” align=”center” link=”url:http%3A%2F%2Fsmkjjt.com%2Fdownload%2F||target:%20_blank|”][vc_custom_heading text=”Video Tutorial For Windows
” font_container=”tag:h2|font_size:20|text_align:center|color:%23f9278e|line_height:2.5″ google_fonts=”font_family:Lato%3A100%2C100italic%2C300%2C300italic%2Cregular%2Citalic%2C700%2C700italic%2C900%2C900italic|font_style:700%20bold%20regular%3A700%3Anormal”][vc_video link=”https://youtu.be/LgqNZIiHud0″][vc_toggle title=”Setup Guidance (iOS)” custom_font_container=”tag:h2|font_size:20|text_align:center|color:%23f9278e|line_height:2.5″ custom_google_fonts=”font_family:Lato%3A100%2C100italic%2C300%2C300italic%2Cregular%2Citalic%2C700%2C700italic%2C900%2C900italic|font_style:700%20bold%20regular%3A700%3Anormal” use_custom_heading=”true”] Step 1: Open the app and click on the “Settings” on the bottom right corner.
 Step 2: Click on “Device Connect”.
 Step 3: Click on “Bluetooth”.
 Step 4: Turn on your device Bluetooth connection.
 Step 5: Make sure your device is connected with “SMK-M8”.
 Step 6: You can come out from the app, search for your air waybill PDF file that you’d like to print and click “Share PDF”.
 Step 7: Once you have selected your air waybill PDF file, proceed to share it to “SoonMark Print” app.
 Step 8: Key in “100” for label width and “150” for label height then click on “preview”.
 Step 9: Adjust and fit the air waybill within the dotted line. Once adjusted, click on the crop icon on the top right corner.
 Step 10: Click on the printer icon on the top right corner.
 Step 11: Key in the number of “Print copies” for your AWB and finally click on “Confirm print” to print the air waybills from your thermal printer.[/vc_toggle][vc_btn title=”Download ‘SoonMark Print’ for IOS” style=”gradient-custom” gradient_custom_color_1=”#f9278e” gradient_custom_color_2=”#f9278e” align=”center” link=”url:https%3A%2F%2Fapps.apple.com%2Fmy%2Fapp%2Fsoonmark%2Fid1480676109||target:%20_blank|”][vc_custom_heading text=”Video Tutorial For IOS
” font_container=”tag:h2|font_size:20|text_align:center|color:%23f9278e|line_height:2.5″ google_fonts=”font_family:Lato%3A100%2C100italic%2C300%2C300italic%2Cregular%2Citalic%2C700%2C700italic%2C900%2C900italic|font_style:700%20bold%20regular%3A700%3Anormal”][vc_video link=”https://youtu.be/o2atU329ifM” align=”center”][vc_toggle title=”Setup Guidance (Android)” custom_font_container=”tag:h2|font_size:20|text_align:center|color:%23f9278e|line_height:2.5″ custom_google_fonts=”font_family:Lato%3A100%2C100italic%2C300%2C300italic%2Cregular%2Citalic%2C700%2C700italic%2C900%2C900italic|font_style:700%20bold%20regular%3A700%3Anormal” use_custom_heading=”true”] Step 1: Open the app and click on “Settings” on the bottom left corner.
 Step 2: Click on “Device Connect”.
 Step 3: Click on “Bluetooth Connection”.
 Step 4: Allow your device connect with Bluetooth.

Step 5: Make sure your device is connected with “SMK-M8”.
 Step 6: Click on “PDF Print”.
 Step 7: Key in “100” for label width and “150” for label height then click on “Choice”.
 Step 8: Proceed to choose the air waybill file that you’d like to print.
 Step 9: Click on “Preview”.
 Step 10: Adjust and fit the air waybill within the dotted line. Once adjusted, click on the crop icon on the top right corner.
 Step 11: Click on the printer icon on the top right corner.
 Step 12: Key in the “Number of copies” for your AWB and finally click on “Confirm Print” to print the air waybills from your thermal printer.[/vc_toggle][vc_btn title=”Download ‘SoonMark Print’ for Android ” style=”gradient-custom” gradient_custom_color_1=”#f9278e” gradient_custom_color_2=”#f9278e” align=”center” link=”url:https%3A%2F%2Fdrive.google.com%2Ffile%2Fd%2F1sXSR6rIdcapllEcgDeP4Ojp18A83eY_O%2Fview%3Fusp%3Dsharing||target:%20_blank|”][vc_custom_heading text=”Video Tutorial For Android
” font_container=”tag:h2|font_size:20|text_align:center|color:%23f9278e|line_height:2.5″ google_fonts=”font_family:Lato%3A100%2C100italic%2C300%2C300italic%2Cregular%2Citalic%2C700%2C700italic%2C900%2C900italic|font_style:700%20bold%20regular%3A700%3Anormal”][vc_video link=”https://youtu.be/jf94iSQN97U” align=”center”][/vc_tta_section][/vc_tta_tabs][/vc_column][/vc_row][vc_row][vc_column][vc_custom_heading text=”Common Issues About Thermal Printer” font_container=”tag:h3|font_size:30|text_align:center|color:%23f9278e|line_height:2.5″ google_fonts=”font_family:Lato%3A100%2C100italic%2C300%2C300italic%2Cregular%2Citalic%2C700%2C700italic%2C900%2C900italic|font_style:700%20bold%20regular%3A700%3Anormal”][vc_toggle title=”Red Light Issue” custom_font_container=”tag:p|text_align:left” custom_google_fonts=”font_family:Lato%3A100%2C100italic%2C300%2C300italic%2Cregular%2Citalic%2C700%2C700italic%2C900%2C900italic|font_style:400%20regular%3A400%3Anormal” use_custom_heading=”true”]The red light is an indication that the printer has a problem with your thermal label. What you can do now is to ensure the thermal label is loaded correctly and well-fitted with the holder inside the printer.
Then, you can run the paper calibration steps as stated below:
- Turn off the printer first, long press the FEED button on the printer and do not release it.
- Turn on the power switch while pressing the FEED button.
- When the indicator light flashes red and flashes twice, immediately release the button, and the paper calibration is completed.
Take Note:
You need to do the calibration again every time when you change a new paper size or paper type, or the red light flashes during printing.
For more information, you can click HERE!

 [/vc_toggle][vc_toggle title=”Low Quality/ Blurry Prints” custom_font_container=”tag:p|text_align:left” custom_google_fonts=”font_family:Lato%3A100%2C100italic%2C300%2C300italic%2Cregular%2Citalic%2C700%2C700italic%2C900%2C900italic|font_style:400%20regular%3A400%3Anormal” use_custom_heading=”true”]1. Adjust the printing preferences settings: Print Density & Speed
- Slower speed will result in a higher resolution.
- Increasing the number for darkness will result in a darker print. Setting the density too high will result in unwanted dark lines and/or labels getting too hot and sticking mid-way to the printer head. Decreasing this number results in a lighter print.
For Windows:
Go to [Control Panel] -> [Printers and Devices] -> right click on [printer name…] driver-> click [Printing Preferences] -> [Options]->[Print Speed]->[Darkness]


For Mac:
Look for drop down menu under [Printer Features] in the print prompt window,
- Feature Sets: select “Printer Options”
- Set the Print speed and Darkness, according to the demand.

2. Cleaning Solution
Cleaning the print head and rubber platen roller softly with wet cloth also helps to improve the print quality. (PS: NO using tissue)


For more information, you can click HERE![/vc_toggle][vc_toggle title=”Misalignment/Skipping label Issue” custom_font_container=”tag:p|text_align:left” custom_google_fonts=”font_family:Lato%3A100%2C100italic%2C300%2C300italic%2Cregular%2Citalic%2C700%2C700italic%2C900%2C900italic|font_style:400%20regular%3A400%3Anormal” use_custom_heading=”true”]Firstly, have a check on the thermal label whether it is loaded correctly. Then you may need to do paper setting and ensure all the settings at “printing preferences” are correct.
For Windows Users:
Go to [Control Panel] -> [Printers and Devices] -> right click on [printer name…] driver-> click [Printing Preferences] -> [Page Setup] tab->[Edit]
- Type: select “Die-Cut Labels”
- Label Size: set “100mm (width), 150mm (height)”
- Exposed Liner Widths: set “2mm (right and left)”


Then, go [Stock] tab,
- Method: select “Direct Thermal”
- Type: select “Label with gaps”

For Mac Users:
- First, ensure the paper size is set as “4 x 6” inch.
- Select【Printer Features】
- Feature Sets: select ”Media Setting” in the drop down menu.
- Method: select “Direct Thermal”
- Type: select “Label with Gaps”
- Gap Height: set as “3mm / 0.079 inch”
- Post-print Action: select “Tear Off”
- Occurrence: select “After Every Page”
- After first printing, remember to select “last used settings” before the next printing. (refer to the photo)


For more information, you can click HERE ![/vc_toggle][vc_toggle title=” Unable To Be Print Red/Orange’s Color Text/Logo?” custom_font_container=”tag:p|text_align:left” custom_google_fonts=”font_family:Lato%3A100%2C100italic%2C300%2C300italic%2Cregular%2Citalic%2C700%2C700italic%2C900%2C900italic|font_style:400%20regular%3A400%3Anormal” use_custom_heading=”true”]
Have you ever faced this issue when comes to printing air waybills? Don’t worry, all you need to do is simply adjust the printing preferences setting as below.
[Windows Users]
Go to [Control Panel] -> [Printers and Devices] -> right click on [printer name…] driver-> click [Printing Preferences] -> [Halftone]-> select [Ordered]

[Mac Users]
Look for drop down menu under [Printer Features] in the print prompt window,
- Feature Sets: select “Quality” >> Color Option: select “GrayScale”
- Feature Sets: select “Printer Options” >> set Darkness as 7 or above
 [/vc_toggle][/vc_column][/vc_row][vc_row][vc_column][vc_message]Be sure to switch into the sticker air waybill format just inside “Account” > “AWB Format” in order to print it with your thermal printer.[/vc_message][vc_single_image image=”33673″ img_size=”full” alignment=”center”][/vc_column][/vc_row]


